|
Given that I am somewhat of a bonehead,
one day I got the idea to install hardwood flooring in my house.
After talking to people who had done it and a few reps from
my local Home
Depot (take a number, please) store. I decided it was something
I could handle. And actually it was. What I have done here is
recorded my experience so I may be of help to any other boneheads
who are thinking about doing this themselves. Workload wise,
Its probably the male equivalent to giving birth, but the results
are astounding at worst.
Supplies I used:
1 Bostich "air assisted" blind nailer
1 Portable Skill hand saw
1 Permanent marker
1 Measuring tape
1 Hammer
1 Box of 3" floor nails
10 boxes of blind nail cartridges
350 sq. ft. of 1/2in. #1 Red Oak flooring strips (tongue &
groove / varying length)
Something to think about before
you start,
The argument for real
wood:
- It can easily be repaired
- It is easily cut to fit
- It is strong, will last the life of house
- It can be resurfaced indefinitely
- It needs no guarantees
- It looks stunning and natural
- Even as it wears it looks good
Negatives:
- It is hard to install
- It is costly
- It requires rental of machinery
- Requires use of dangerous chemicals |
The argument
for manufactured floors i.e., Pergo:
- Very easy to install
- No (dangerous) chemicals
- Very cost effective
Negatives:
- Difficult to repair
- Can not be resurfaced
- Most do not look natural
- Adhesive will eventually fail
- Usually pieces are difficult to modify |
|
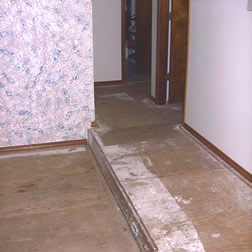
When you rip up your carpeting his is
what you get when you are unfortunate enough to only have
floorboard underneath your carpeting. When you look at
this, it gives you a lot of insight into how cheaply houses
are made. Most of these boards were uneven, cracked and
shockingly different sizes.
If you have any creaks in your floor, now is the time
to fix them before you put the flooring in. You can do
this by driving nails into the area that is creaking (use
a stud finder to locate your support boards). If there
are no support boards in the area you may need to get
underneath the floor and install one between the cross
beams. This sucks especially if hate spiders. |
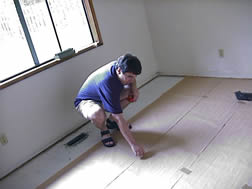
After the carpeting has been ripped up,
if your house is older it may be a good idea for you to
seal the floorboards. You can do this with just about
any type of plain old latex paint, but they do make special
sealers for floorboards.
If you look at the picture to the right, underneath where
I am standing the floor is white. This is because I sealed
the floorboards with KILLZ brand sealer. This is a special
sealer that also kills mold. Since I am allergic to mold
I figured it was worth the extra $$. |
 |
|
If you will also notice in the picture
above I am laying down long strips of paper over the sealed
floorboards. This paper is called AQUABAR. What this does
is puts a layer of protection between the floorboards
and the sensitive wood flooring that will be installed
over it. Aquabar comes in varying thickness. The thicker
the Aquabar the grater the protection against water and
other sources of moisture. And of course the greater the
impact on your budget.
I was not particularly concerned about this so I purchased
the thinnest and cheapest I could find at Home
Depot. |
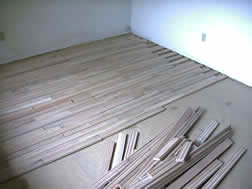
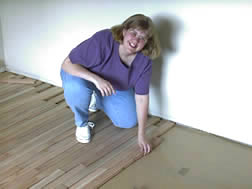
After the Aquabar is secured in place,
(tape will do fine) you will want to start laying down
boards at one end of the room. Lay down about 10 rows
just to get a feel for what you are doing and if there
are any special patterns that you want to get out of the
wood (if you have time for this you need to get a life,
by the way). DO NOT worry about fitting boards exactly
across the room! Leave a gap and when you get to nailing
that row, cut a piece to fit.
My lovely wife assisted me with laying down some boards
here. This was the last time she was seen in this room.
Amazingly though, after I finished the work she showed
up again. Man, I was really starting to worry there... |
 |
|
Many books will tell you that you need
to leave a 1/4 of an inch gap between the drywall and
the wood strips. I was told by a professional not to worry
about this. Drywall has a good amount of give to it, and
if your floor gets enough moisture to expand more than
1/4 of an inch, you have big problems that need to be
addressed. The only thing I made sure of was that the
wood was not so tight as to put force against the drywall.
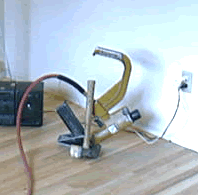
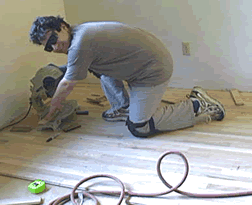
<-- This here is a air assisted BOSTICH "Blind
Nailer". Yes, I know, it doesn't quite have that
reassuring sound to it. Its called a "blind nailer"
because you can't see where the nails are going in. It
fires them diagonally into the side of the wood strips
and anchors them into the floorboards. Otherwise if you
nailed the wood strips in from the top you would see the
nails holes. |
This is an air assisted blind nailer,
the red hose leading out of the back is connected to an
electric air pump. they do make non air assisted ones
but ohhhhhh, is that my arm that just fell off?? I highly
suggest you get an air assisted device.
When you start nailing, you will have to do the first
5 or so rows by hand. This sucks but when you see the
nailer you will understand why. It is possible tough to
get a hand nail gun for this.
You will need a some sort of hand saw to cut the strips
of wood that will fit into the gaps near the wall that
you left when laying the wood out. |
 |
|
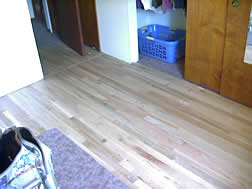
As you can see here from the finished
product the results are fabulous.
I do have to admit though that I did not do the sanding
and finishing of the floor myself. I decided that this
was going to be more than I could handle given that the
sanding is extremely messy and potentially dangerous.
I would suggest you research this part of the process
before deciding what is best for you. I called Sargent's
Wood Floors (Located in Portland, Oregon), they
came out to the house and did a fantastic job of sanding
and finishing the floor. They were very reasonably priced
as well. |
The most difficult part is that you will
have to find somewhere else to stay while this is being
done if you don't have a room far enough away or that
can be sealed off (air tight) from the work area. The
sanding will cause huge dust problems (if you use heavy
equipment) and the odor of the finnish is pretty unbearable
(not to mention toxic) for at lease 2 days after its been
applied. So consider this when planning your project.
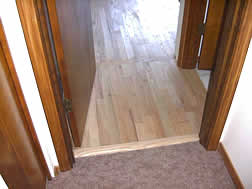
If you'll notice where the carpet meets the wood here
there is a special board called a "decline".
This is really great to use when your wood floor is going
to meet up with another surface. It provides a step down
(or up) to the adjoining surface. |
 |
|